Where to find clay, and how to test it before you fire it
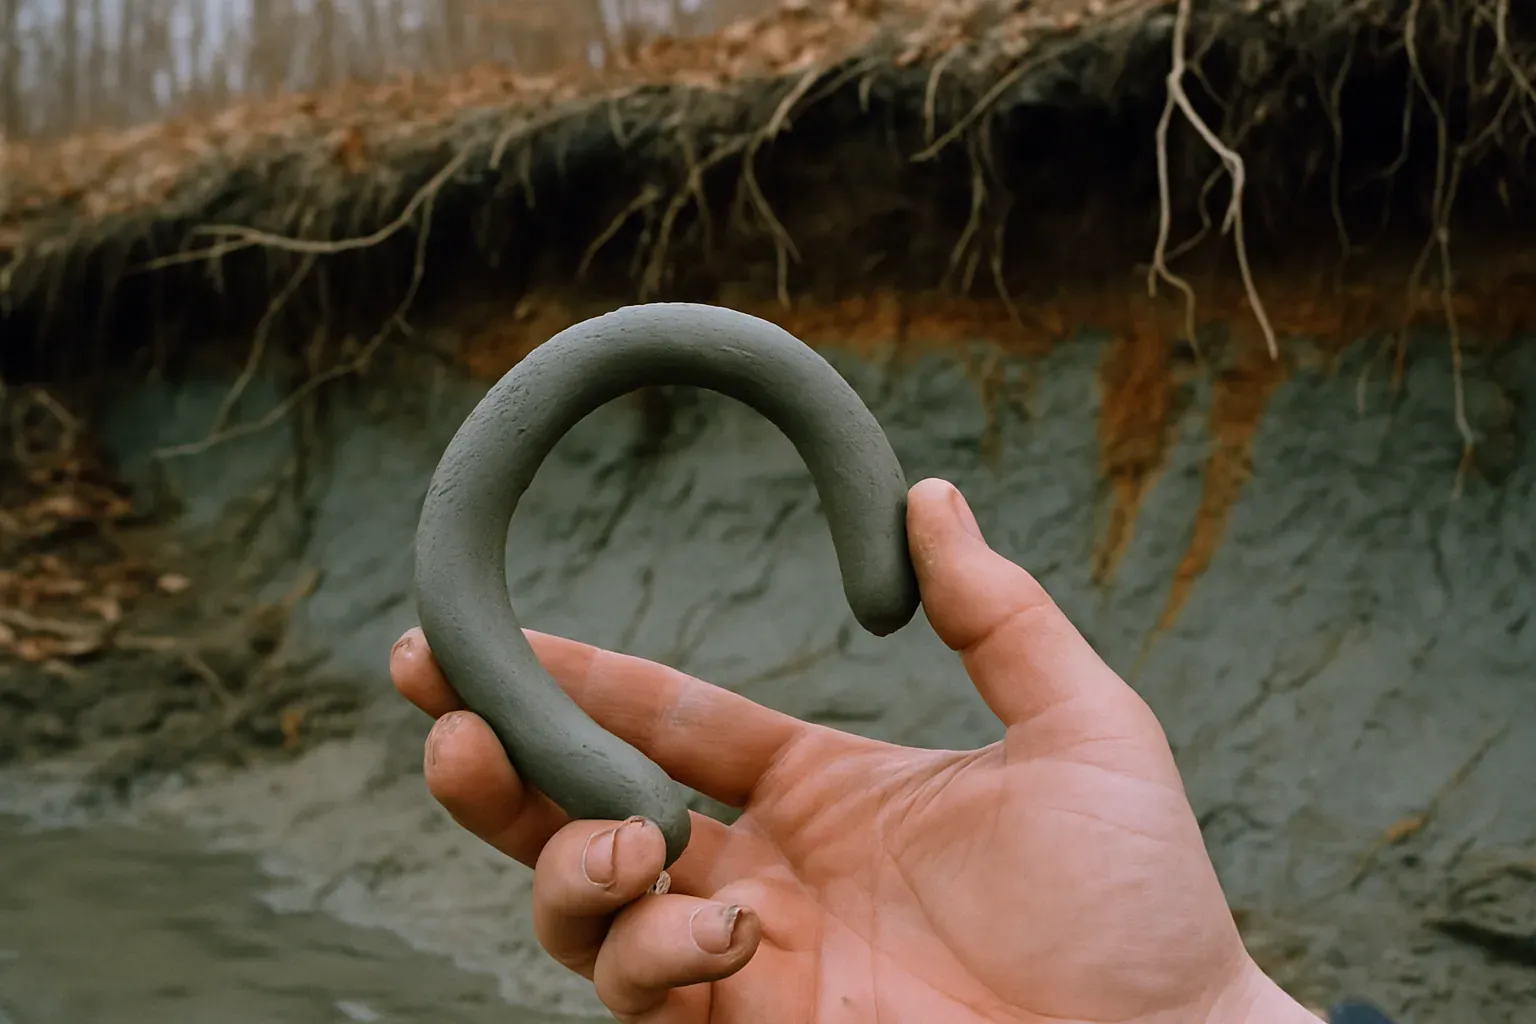
Clay sits in the subsoil, the layer under the dark topsoil, usually 15 to 30 cm down. You'll see it exposed in creek and river banks, fresh road cuts, construction digs, ditches, and the root holes of fallen trees. Look for smooth, sticky ground that cracks into plates as it dries. Then test it, because most dug clay is low-fire earthenware.
That last part is where people get hurt, or at least where kiln shelves do. A clay you dig has no data sheet. Digitalfire, Tony Hansen's ceramic reference, says it plainly: a native clay's properties are a mystery until you test them. The clay in your creek might be a fine cone 6 stoneware, or it might be an iron-rich red that melts into a puddle about 140 F below cone 6. You find out on a test tile, not on a pot you care about.
Where can you find clay near you?
Anywhere the topsoil has been cut away. Creek banks and river bends, road cuts, building sites, drainage ditches, eroded hillsides, quarry edges, and the hole left when a big tree tips over all show the subsoil in cross section. Clay is that subsoil when it's smooth and sticky. It's often grey, blue-grey, buff, or rust red.
Some places are better bets than others:
- Creek and river banks. Moving water sorts sediment by size, and the finest particles settle out in slow water. Look on the inside of bends and in old backwater channels. Leela Chakravarti, a potter in Devon, found hers as smooth lumps in the bed of a stream.
- Road cuts. A fresh cut shows every layer at once. The band right under the topsoil is where clay collects as rain carries fine particles down over thousands of years.
- Construction sites. Foundations and trenches go down past the topsoil, and the spoil pile beside them is often clean subsoil. Ask the site manager first.
- Your own yard. If your garden turns to sticky paste when it rains and cracks open in a dry spell, the clay is under your feet. Dig past the dark layer.
Topsoil itself is the wrong layer. It's full of roots and humus, and all of that burns out in the kiln and leaves a weak, porous body. Dig until the color changes and the soil turns dense and smooth.
How do you know if dirt is clay?
Wet a handful and roll a coil about as thick as a pencil. If it bends into an arc without cracking, it has enough clay in it to work. If it crumbles, there's more sand or silt in it than clay. Colorado State University Extension's ribbon test gives a number: squeeze moist soil out between thumb and finger, and a ribbon 2 inches or longer means clay.
The same CSU fact sheet (GardenNotes #214) sorts the shorter ribbons too. Under 1 inch is a loam. One to 2 inches is a clay loam, which can still be usable once you sieve out the sand. Rub a pinch between wet fingers while you're at it. Gritty means sand. Smooth and slick means silt or clay, and the clay is the one that sticks.
Dry ground gives its own sign. Clay shrinks as it dries, so a dry clay patch splits into a pattern of plates, like crazed glaze seen from above. A field of those cracks on a dry creek bed is a good place to dig.
Check the soil map before you dig
In the US you can look before you walk. The USDA's free Web Soil Survey maps the soil on almost any piece of ground, layer by layer, and one of its ratings is percent clay. In soil science, clay means particles smaller than 0.002 mm, and a soil only earns the texture class "clay" at 40 percent clay or more.
Zoom to your area, pick a map unit, and look at the percent clay for the deeper layers rather than the surface layer. A map unit with a subsoil around 40 percent or more is worth a visit. The survey can't tell you how the clay fires. It can save you a weekend of digging sand.
Is it legal to dig clay?
On private land it's legal with the owner's permission, and without it, it isn't. On public land the rules depend on who manages it, and they differ between a city park, a state forest, and federal land. Ask the managing office before you dig. Most potters only need a bucket or two, which makes the conversation easier.
Utah potter Adam Corbridge keeps his own rule short: take small samples, stay off protected land, and respect private property. Fill your hole back in. Stay well away from undercut banks, since a vertical face of wet clay can slump without warning.
How to clean up wild clay
Dug clay comes with rocks, roots, sand, and sometimes limestone. Digitalfire's procedure for evaluating a found clay is the standard way to sort it out:
- Dry it completely. Spread it out on a board until every lump is bone dry. Dry clay slakes far faster than damp clay.
- Slake it. Break the lumps to about a centimeter and drop them into hot water. Digitalfire lets them sit about 30 minutes, until they fall apart on their own.
- Sieve it. Pour the slurry through a 30 mesh screen to catch rocks, roots, and coarse sand. Chakravarti uses 50 mesh for a smoother throwing body.
- Let it settle overnight, then pour off the clear water on top.
- Dry it to working stiffness on a plaster slab, or hang the slurry in a pillowcase.
Before you sieve, run a vinegar test. Drip vinegar on a dry lump. Limestone is calcium carbonate, and acid makes it fizz. A gentle fizz all over means the lime is spread evenly through the clay. Fizzing from single specks means grains of limestone, and those are the ones that ruin pots.
Lime pop happens when moisture in the air reaches a lime nodule trapped in a fired body. The nodule expands and blows a cone-shaped crater out of the surface, with a white or black speck at the bottom, sometimes right out of the kiln and sometimes years later.
Source: Jeff Zamek, "Lime Pop," Ceramic Industry, December 2009.Zamek's fix is the same as the processing above: screen the clay, and pick out any white specks you can see in it, wet or dry.
How hot can you fire wild clay?
Assume cone 04, 1945 F (1063 C), until a test tile tells you otherwise. Most surface clays are iron-rich earthenwares, and iron is a strong flux. Digitalfire's terra cotta notes put the danger close to cone 04: these clays warp and blister by cone 01 and melt by cone 2, only about 140 F hotter.
Some wild clays go a lot further. Chakravarti bisqued her Devon stream clay at 1000 C and then took it to cone 7, where it fired a deep chocolate brown. The clay in Digitalfire's own evaluation absorbed only 3.3 percent water at cone 04 and held up to cone 4 without bloating. You can't tell which kind you have by looking. So fire a ladder of tiles, one cone at a time, and stop at the first one that blisters, bloats, or slumps.
| Test step | Cone | Peak at 108 F per hour | What you're checking |
|---|---|---|---|
| 1 | 04 | 1945 F (1063 C) | Does it survive at all? Color, hardness, absorption |
| 2 | 02 | 2016 F (1102 C) | Densest point for most red clays |
| 3 | 01 | 2046 F (1119 C) | Where terra cotta starts to warp and blister |
| 4 | 4 | 2124 F (1162 C) | Is it a mid-fire clay? |
| 5 | 6 | 2232 F (1222 C) | Only if step 4 came out dense and flat |
Peak temperatures are Orton self-supporting cone equivalents at a final heating rate of 108 F per hour. The Orton cone chart has every cone between these steps.
Every tile goes into a bisqued saucer made from a clay you already know. A melting wild clay will run, and a saucer is cheaper than a kiln shelf. If the tile slumps flat inside it, you have your answer for that cone.
A firing schedule for wild clay test tiles
Fire the first round slow. Dug clay carries more water and more organic matter than a bagged body, and both need time to leave. Even after sieving, there's plant matter in the fines that has to burn out before the surface seals. This is the slow cone 04 bisque the firing schedule builder writes, from a 75 F start:
- 80 F (44 C) per hour to 250 F (121 C), to drive off water.
- 200 F per hour to 1000 F (538 C), to burn off organics and carbon.
- 100 F per hour to 1100 F (593 C), easing through quartz inversion at 1063 F (573 C).
- 180 F per hour to 1695 F (924 C).
- 80 F per hour to 1945 F (1063 C), cone 04.
That's 13 hours 22 minutes to peak. If your tiles are thick or still a little damp, add a hold at 180 F to 200 F overnight first, as described in the guide to candling before a bisque. Vent the kiln through the organics stage. Wild clay can smoke and smell well past what a commercial body gives off. For the reasons behind each segment, see the full bisque firing schedule.
Once a clay passes cone 04, set the builder to the next cone on your ladder and fire a glaze-speed test. Keep a witness cone beside the tiles each time, so the result is tied to heat-work and not to a controller reading.
Read your test tiles
Measure two numbers on each tile, and write them on the back with iron oxide before firing so you never mix them up.
Shrinkage first. Press a 10 cm line into the tile while it's wet. Measure it dry and again after firing. A line that comes out at 9.0 cm has shrunk 10 percent from wet to fired, which is in the normal range for a throwing clay. Commercial throwing bodies land near 11 to 12 percent (Standard Clay's 417 Red and 112 Brown both fire to about 11). A wild clay well above that will crack more as it dries, so blend it with a bagged body or some fine sand.
Then absorption. Weigh the fired tile, boil it, let it cool in the water, pat it dry, and weigh it again. A 40.0 g tile that comes out at 44.4 g absorbs 11 percent, right where Digitalfire puts a terra cotta at cone 04 (10 to 12 percent). Under about 3 percent is stoneware territory, and the stoneware vs earthenware guide explains what that means for functional pots.
Last, look. Bubbles, a glassy skin, a tile stuck to its saucer, or edges that curled up all mean the cone was too hot. A chalky surface that scratches with a fingernail means too cool. The cone below the first failure is your clay's working cone.
Dig, sieve, then let the tile decide
Dig below the topsoil where water or a shovel has cut the ground open. Roll a coil, drip some vinegar, and carry home a bucket of what passes. Then slake it, sieve it, and fire a tile to cone 04 in a saucer before you try anything hotter. Set cone 04, bisque, and slow speed in the firing schedule builder and it prints the ramps for that first firing in F or C.
Sources
- Digitalfire reference (Tony Hansen), "Evaluating a clay's suitability for use in pottery" (drying, slaking, 30 mesh screening, cone 04 and cone 4 results), plus the glossary entries on native clay and terra cotta (cone 04 porosity, blistering by cone 01, melting by cone 2) (digitalfire.com).
- Colorado State University Extension, GardenNotes #214, Estimating Soil Texture: the ribbon test lengths (extension.colostate.edu).
- USDA Natural Resources Conservation Service, Web Soil Survey: percent clay by soil layer, clay as particles under 0.002 mm (websoilsurvey.sc.egov.usda.gov).
- Jeff Zamek, "Lime Pop," Ceramic Industry, December 2009 (ceramicindustry.com).
- Adam Corbridge Pottery, "Utah Wild Clay: How to Find, Process, and Test Local Clay" (adamcorbridgepottery.com).
- Leela Chakravarti, Leela Pottery, "Wild Clay Pottery: Top Tips From Processing to Firing" (leelachakravarti.com).
- Orton pyrometric cone temperature chart, self-supporting cones at 108 F per hour (ortonceramic.com).
- The bisque schedule and its 13 hr 22 min total are computed by the KilnSchedule builder: cone 04, bisque, slow, 75 F start, empty kiln.
Build your firing schedule
Pick your cone, choose bisque or glaze, set a speed, and print the ramp and hold sheet free.